Tuesday, January 28, 2014

DIY Fabric Covered Mouse Pad


  1. Trace the mousepad shape to the fabric. 
  2. Cut the shape. 
  3. Put Fray Check glue on edges of fabric. 
  4. Spray adhesive on the mousepad. 
  5. Put fabric on and smooth out.

Wednesday, January 8, 2014

Tuesday, January 7, 2014

Monday, April 23, 2012

DIY Entry Way Mantel


Finally got a chance to upload our mantel pictures to this blog. I went back to my old emails but couldn't find the source I used to build the mantel. The one closes I found was this one: http://www.leeswoodprojects.com/mantel_shelf.html. However the notes says 45 degrees... which is incorrect. It should be about 33/33.6 degrees...because you want the bottom of the mantel to taper in.

Primer and 3 coats of Ultra White by Behr.

Hung it up.

Creating the coat racks to go on the bottom of the mantel. Simply a piece of plywood we had left over from building a desk top, 1 piece of trim cut to 45 degrees, wood glue and nail in. The cost of the coat rack completely depend on the cost of the hooks. Home Depot and Lowes sells each hook rack for $5-6 piece.. for the nice ones. Super expensive if you need quite a few. I found these on Amazon for $1 a piece!!! And I love the way it looks. Unfortunately they don't have it on Amazon anymore.

Finally, a white bench from Ikea. We got a steal on this one! Originally the price is about $299ish. But we found this guy in the "As Is" area for $89 bucks!! The edge of two sides of the bench was a tiny bit messed up but white paint fixed the problem. We spray paint the knobs to black to match the coat rack.
The entire project (excluding the bench) was roughly about $30-$35. Usually a mantel like this...for this length (pretty long) can cost up to $800!! And that's the mantel itself, not even including the coat rack. I feel pretty good about the amount of savings, but the awesome part was of doing it ourselves!!

Friday, January 13, 2012

Pottery Barn Vintage Glass Hardware

Tuesday, December 27, 2011

Friday, December 23, 2011

Wednesday, December 21, 2011

Monday, December 19, 2011

Tuesday, December 13, 2011

Thursday, December 8, 2011

Sunday, December 4, 2011

DIY Fabric Ornaments

 Over the weekend my sisters and I, along with my niece, made some fabric ornaments. I love the way fabric ornaments look. So vintage...with the right fabric that is!


This have been done before and I'm sure you'll be able to find a lot of different ways to do it on the internet. Here are my steps:

What you will need:

  • Scissor 
  • Fabric 
  • Ribbon or twine 
  • Pins 
  • Glue gun 
  • Styrofoam balls 

Cut your fabric into strips about .5 inch thick. The length should be about a yard long (buy a yard of fabric and cut along the longest side). Put a tiny dab of glue using your glue gun onto the styrofoam ball and put the fabric on.


Roll your fabric onto the ball. You will notice that by criss crossing the fabric, it is much easier to keep the fabric in place. Cover the entire ball with fabric...make sure the foam isn't showing. Glue the end of the fabric to the ball.


Using ribbon or twine, make a loop and knot the ends. Stick a pin threw the knot and push down. And there you have it! It's super easy and will look great on your tree. You can use any fabric you like. I love the look of canvas, linen, and burlap (going for a vintage theme this holiday season!). My sisters used different color ribbons and added rhinestones to the ornaments. The possibilities are endless!


Thursday, December 1, 2011

Monday, November 28, 2011

Tuesday, November 22, 2011

Crate and Barrel Scoop 3-Piece Serving Set

With the holidays around the corner I had to grab some serving pieces since we're hosting Thanksgiving this year. So after some quick browsing, I ran over to Target to pick up the pieces. I was hesitant as I wanted the pieces to be a shiny steel...and in the picture it looks dull. In person it is lovely...and very shiny. And for the price it was a no brainier. Also I happen to like the organic shape in the 'spoon with holes' from Target better.

Crate and Barrel - Scoop 3-Piece Serving Set
$49.95

Target - 3-pc. Stainless Steel Hostess Set
$4.84

Monday, November 21, 2011

Ballard Designs Verdi 1 Light Chandelier

Recently, I was browsing through Ballard Designs online and was so surprise to see the Verdi 1 Light Chandelier. I have the exact same one for a much lower price!

Ballard Designs - Verdi 1 Light Chandelier
$229

Overstock - Clear Crystal Brown Base Chandelier
$105.99
I got a similar one from Lowe's a few months back for my little office. I purchased it at the store for about $98. $40-80??. I forgot the exact price. However, I am unable to find it on their website...so you might have to check your local Lowe's store to see if they have it in stock.
Lowes's Westmore Lighting 1-Light Chandelier.

Thursday, November 17, 2011

Wednesday, November 16, 2011

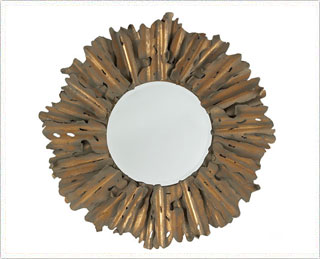
Neiman Marcus Hemani Mirror

Lovely sunburst mirror. Sunburst mirrors are very trendy right now. Love the Neiman Marcus Hemani mirror...but with the price plus the delivery & processing fee... I think the exact one at a much lower price makes it much more attractive.
Neiman Marcus Hemani Mirror
$425
(plus delivery & processing: $110)

Valley Furniture Hemani Mirror
$399

Valley Furniture
American Green Realty
LuvFab Clothing Accessories Beauty SupplyBeauty by Threading